Temperature logger built with JavaScript and Arduino


Besides programming and all that crazy computer stuff, I am also a homebrewer. I like to make my beer at home, but the fermentation process needs some special temperature treatment which can be hard to achieve, and it needs to be controlled all the time. Of course, this isn't a topic about that. I am also a huge fan of Arduino and the Internet of Things, especially when programmed using JavaScript. It appears that it could be not only fun but also very useful in day-to-day life. We used to say that our beer is a 'craft beer'. I probably could say that the beer-making technique is a craft and all things around it.
This article shares how I built a temperature logger with JavaScript and Arduino for my home brewery.
First things first. Let's see what I needed and why I used Arduino.
I have two fermentation buckets which I always put into thermal bags. This gives me the option to achieve the 4-5°C less than room temperature. It is the simplest way to control temperature. You just need to put two bottles of frozen water inside the bags with the fermentation buckets. Sometimes I want to know exactly how the temperature history log looks throughout the night etc. I need sleep, so I don't want to sit and look at the thermometer all the time. I just need to test it to know when and how many bottles I need to put into the bags to keep the necessary temperature inside. This is why I need a temperature logger. Of course, you can buy something like it in many shops. But why not use my old Arduino board and create my logger? This is why I used Arduino for that. I like to play with it, and I've already got many pieces like a board, cables, resistors, temperature sensors, etc. You can use this kind of tool in many other situations, not only in-home brewery, of course.
Ok, so here’s what we need to achieve our goal.
I needed a simple NodeJS app that would log the temperature in the bag each hour. So it should prepare a file with the date and time and also temperature reading line by line. This should be a standard .txt file. We will use a standard laptop with Ubuntu OS. So it would be best if you keep your computer on when utilizing this logger, but of course, you could use other small computers like Raspberry Pi, etc. It just needs to run Node and log the temperature each hour. It could do many things like preparing some charts or datasheets. You are limited only by your imagination.
What hardware do we need?
We need the Arduino board. I use Arduino Uno. You also need BreadBoard + Jumper Wires, resistor (you can use 4,7 kΩ), Cable Temperature sensor DS18B20 with probe. We will use a small temperature sensor for the tests, but of course, in the end, we need a long sensor with a probe to be able to place it inside the bag. But for the tests, we can use a standard small sensor, which is the same DS18B20 type sensor but much smaller. You can buy all that stuff on eBay and other electronic shops. These links are just samples.
What software do we need?
Of course we need NodeJS. We also need Johnny-Five the JavaScript platform for Robotics and IoT. With Johnny-Five, all will be much simpler. We will also need the newest Arduino IDE. I'll show you how to install it on Ubuntu in the next paragraph. This is all we need here. Let's start.
How do you install and use Arduino IDE?
What you need to do first is to install Arduino IDE. We need Arduino IDE 1.6.4 or higher. You can find instructions on the net, but it depends on your operating system. We will use an Ubuntu-like system here, so here are the instruction: https://www.arduino.cc/en/Guide/Linux.
After you run your Arduino IDE app, you'll need to do a couple of things. First, we need to set up our port. We need to go to Tools -> Port in the main menu and set up the port to /dev/ttyACM0. (It could differ depending on your OS) Then we need to install ConfigurableFirmata, which is required to run our temperature sensor with Johnny Five. You need to go to Sketch -> Include Library -> Manage Libraries and then search for ConfigurableFirmata and click on Install. You'll find more information here: https://github.com/firmata/ConfigurableFirmata. After installing it, you’ll load it to your board, but first, we need to connect our Arduino board.
In short, Arduino IDE is here because we need to be able to load the necessary libraries to our board. We will use Johnny-Five, a JavaScript framework, to connect to it and do many operations with our board and all the sensors we want to use.
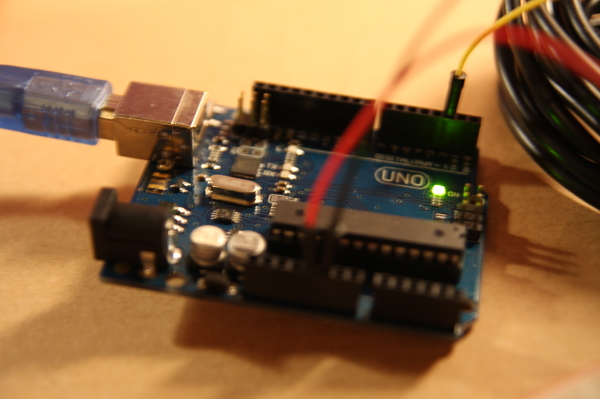
How do you prepare the Arduino board?
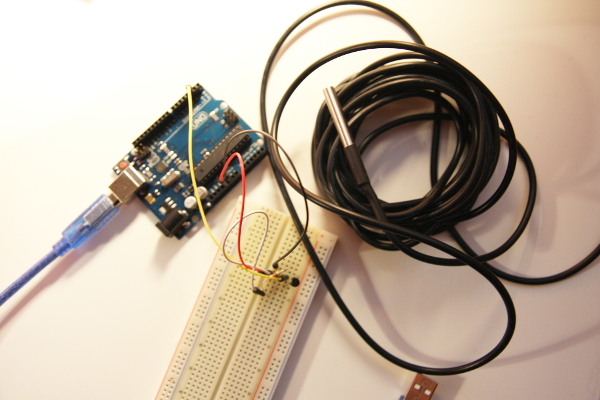
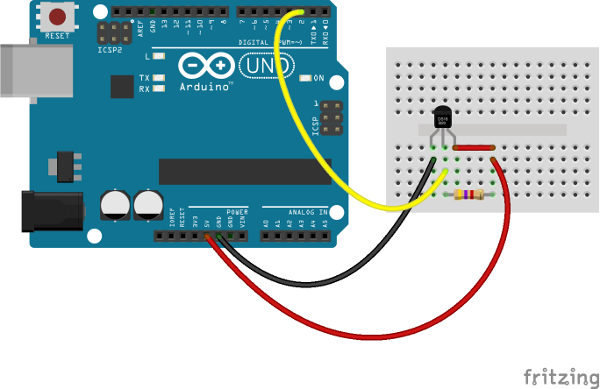
We will use the Thermometer – DS18B20 sensor to be able to read the temperature. All you need is to connect your sensor and Arduino board exactly as it is shown on the picture:
 Source: http://johnny-five.io/examples/temperature-ds18b20/
As you can see, we’re going to use a small DS18B20 sensor just for demo purposes, but you can also connect another sensor with a cable to put it in the cooling bag with fermentation buckets and measure it outside.
Our circuit here is quite simple. We just use one resistor and some cables to wire it up to our Arduino board and receive the data through the digital slots. On the image above, you can see how to connect particular parts.
Ok, let's see how we can use our hardware configuration.
Temperature logger app.
We have our Arduino board connected, and we also have our Arduino IDE running. All we need to do now is to write our simple application in Node, which will log the Arduino's temperature sensor readings into the standard .txt file.
Oh, and remember to load ConfigurableFirmata. In Arduino IDE go to File -> Examples -> ConfigurableFirmata and click the 'load' button.
The app written in JavaScript (our logger) is published on GitHub as an open-source code so let's dive in and check what we've got there.
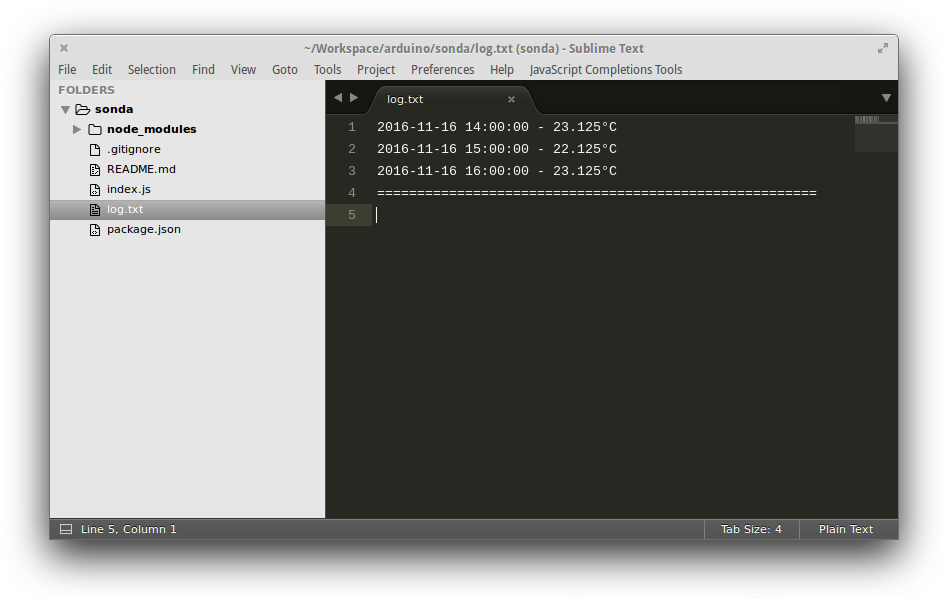
You can clone the app from here: https://github.com/juliancwirko/arduino-temperature-logger. As you can see, this is a very basic and simple app. For now, we just need it to be able to prepare our temperature log in the log.txt file.
What I've done here is install Johnny Five from Npm, and I also use standard Node's IO operations to create and write to the .txt file. Of course, I also use the Johnny-Five API to read the temperature. The whole app is located in one index.js file. The code is a simple example of using Johnny Five. We use Johnny-Five to connect to our Temperature Sensor connected through Arduino board. We just listen to data changes (temperature readings), and then we create a file and write the readings line by line with one-hour frequency (we don't need more frequent readings here, but of course, you can change it). The code is quite readable, and you can always refer to the Johnny-Five API docs: http://johnny-five.io/api/.
As soon as you connect your Arduino board and clone the app, you need to install dependencies by npm install, and then you can run it by sudo node index.js. If you are using an Ubuntu-like OS, you would probably run it as a superuser. When the app starts, it will create the log.txt file, and it will write the new temperature reading every hour.
Ok, so how can I expand this starter demo app?
You’re probably thinking – ok, so you have your private temperature logger, and it’s pretty messy. What is this article for?
I wanted to open some doors maybe so you would be able to open the next ones. I mean, this is what I wanted at the moment, but you can do whatever you want with this kind of app from this point. Imagine some backend app integration and automatic logger which will log the temperatures all the time. Imagine e-mail notifications or even SMS notifications if the temperature goes below its limit. You can also integrate it with some native smartphone apps. Or use something like Raspberry Pi to compress the size of your computer behind it. You could even incorporate it with other services like social services or other specialistic services. I’m sure you’ll find many other applications for it.
Summary
My basic temperature logger is quite helpful. Of course, for now, I have to remember not to shut down my computer and to be careful with all the wires, but it’s pretty cool. All the parts are cheap, even in my country ;) So I have it almost for free.
This blog post and demo app will show you how useful IoT open hardware tools can be, especially when you know one programming language. I understand JavaScript, so frameworks like Johnny Five or Cylon are remarkable for me, but you could use any programming language. You could use Arduino, but also other stuff like Raspberry Pi or Tessel or any other.
This also shows how simple it is to build something worthwhile even when you don't know about electronics much, and you are just a front-end guy.
I just wanted to share my thoughts on this occasion. I hope that someone finds it useful. Cheers!